Wednesday, November 29, 2017

Experimenting with Set-In Piecing Simplified

Have you discovered Jodi of Tales Of Cloth in Australia on Instagram?
She and her husband cut and sell precut pieces for English paper piecing and she is very creative!
Her Instagram name is @talesofcloth and you can browse their website HERE.

For the past year, she's offered a monthly program for a block she named Ice Cream Soda.  It's perfect for fussy cutting and dozens of stitchers have been posting their blocks -- check it out for yourself and search the hashtag #icecreamsodaquilt -- there are 3277 posts!?!

So I thought I'd give machine piecing it a whirl!
Inspired by everyone's fussy cutting I cut into this hoarded piece of Charley Harper's sandpiper fabric -- perfect.  I have a sacred stash of "landscape" fabrics that offered several possibilities.
The pieces were easy to cut using Marti Michell's Set G and 2" Kite and Crown set.
The first step is to fiddle around with the pieces to determine the best piecing order.
This step is such a valuable skill -- learned it from Mary Ellen Hopkins years ago!!
I often begin with a unit of three pieces -- it's usually a good starting point!
As I've said before, I get more accurate centers when machine piecing for 6-pointed stars by working in thirds.
If you are new to my blog, I chain piece through y-seams -- that's what Set-In Piecing Simplified is all about!!  Click on the picture of my face up there on the right to read about the teaching guide I see on Etsy!
So far so good!!
Then things began to unravel a bit -- because the y-seam intersection has four seams coming into it, it was more challenging.  That made stopping in the right place more challenging and took some of the fun out it for me.  It was days before I got the block completely assembled.
It looks good here, but the effort to assemble it was frustrating and I still need to add some little diamonds to finish off this experiment.
I came and went from it so many times, that I mixed up two of the bird pieces and lost the symmetry of their direction (go back up and look at the beginning layout).
Do I go back and fix it??
Conclusion -- this block will be easier and more enjoyable to paper piece!!
So after the first of the year, I'll be ordering the papers so I can be part of the fun on Instagram, too!!

There's another experiment on the cutting wall!
The inspiration is from an excellent EPP tutorial by blogger Aylin that she wrote for the Finish-A-Long 2013.  She called the pattern Ferris Wheel.
You can read it HERE.
The cutting is plodding along and with Christmas gift deadlines, I won't have time to experiment with the stitching until the New Year.  It could be another fail but we'll see??

If you follow me on Instagram, I just reached 600 followers over there and have a GIVEAWAY posted -- closes Friday morning, 12/1 at 8 a.m. EST.

Keep stitching!!
Mary


Monday, November 20, 2017

Starting a New Quilt

Have you tried out any of the quilting magazines that are available digitally?
Several of them promote their new issues on Instagram and I was charmed by a pattern that the Quilters Companion featured last week from the new issue, #88.
It's an Australian publication and I couldn't find it locally but was able to purchase it quickly and easily via the website, Zinio.com -- just go to the site and search for the magazine by name.
Quilters Companion
The pattern is Jewel of the '30s by Jenny Tate.  The pattern is written for EPP but I need a new "leader and ender" project to carry me through my holiday stitching so I'm machine piecing it.
Now you might wonder why I purchased the magazine but I firmly believe it's important to support designers by buying their ideas even when I don't do it exactly as they have written.
If they don't get financial support, they lose their motivation to share their ideas.
And let's face it quilters, we need their ideas!!
So here is my piecing strategy for this one! 
I pulled out my stack of 30s prints.
Then without coordinating, I pulled sets of six prints -- blue, lavender, orange, pink, green, and yellow. 
Marti Michell has several sizes of "jewel" templates and I'm going with the largest one -- this is the multiple shape template from Set H that came be used to cut a "jewel".
I stacked my six prints on top of a 6" by 8" mat on top of my table size mat. After making the first three cuts, I can pull away the yardage.
The reason for the small mat is to be able to rotate everything so I can always cutting along the right side of the template (because I'm right handed) or along the top edge.
Notice the left end of the template is falling off my fabric.
I don't need the full diamond shape for the "jewel".
Once I've cut around the template as it lays, I need to trim the left end to complete the "jewel" shape. 
A simple twist of the template to align the purple lines that define the "hexagon" shape of the template allows me to trim off the excess (along the top edge in the picture below).
I cut two stacks from each group of six prints.
I will piece one set as cut.
The second set of each group, I mixed and matched with five other sets to scramble things up a bit more.
It was like playing cards, dealing out one "jewel" to each pile but not duplicating a color. 
Six new assortments without any more cutting. 
To keep each assortment easy to manage, I set up three pairs using the same color arrangement for each set -- orange with blue, yellow with lavender, green with pink.
These color combinations are opposite each other on the color wheel which assures me of good contrast and each pair is a warm color with a cool color -- good for contrast, too!
Here's one of the sets ready to stitch.
It took a couple de-stitching events to realize that to maintain the alternation of warm and cool which helps create more contrast in each set, I needed to have the warm print on top of the cool print for all three pairs.  
Taking the time to set up your piecing before stitching prevents the disappointment of have the pink next to lavender, etc. which might look clunky in the finished block.
Call me fussy, but I like balance!! 
If you've been following me for a while, you know what is next -- chain piecing through y-seams!!
I chain piece constantly and this technique of stitching has become effortless for me.
Stitch onto the pair at the sharp end of the "jewel".
Pivot at the dot and stitch off the piece and onto the next pair.
Repeat, repeat, repeat.

When I have three pair together, I press the seam towards the cool print (blue, green, lavender) to set up the seams swirling in one direction on the back side of the block. 
I'm ready to assemble the three pairs into a wheel. 
I need both ends of these seams to be open so I stitch into the seam at an angle, 
then pivot, stitch the seam, 
pivot 
and stitch off.  
I could assemble the wheels by stitching two sets of three "jewels" together but frankly, I get more precise centers doing three pairs.  I do six-pointed stars the same way.  It's an extra y-seam, but the results are better -- and not just for me.  My students have the same experience.
And look at the way the center lays flat on the back side!
I've been working with and teaching Set-In Piecing Simplified for five years and the instructional leaflet I sell on Etsy (HERE) has lots of pointers to help you avoid the pitfalls and get up and running with this idea quickly. 
I think I've made all the mistakes possible to save you the trouble!!

At this point, I have four wheels finished.
They will be set together with hexagons and I'm auditioning two options -- both white backgrounds -- one with a white dot and the other with a pale gray dot.  
I think the pale gray dot is more interesting but it will be a couple weeks before I have to decide.
My plan is a baby quilt though at this point there is no baby on the horizon.
Happily, this issue of Quilters Companion has a couple more projects that look interesting!!

This is a busy week for me -- I'm the host at @52quilters on Instagram this week!!
So if you're an Instagram groupie, check me out over there!!

So glad I don't have to clean house for Thanksgiving this year -- just make a couple pies to take along to dinner with my new daughter-in-law's family!
Happy Thanksgiving!
Mary


Thursday, November 16, 2017

Big Finish!!

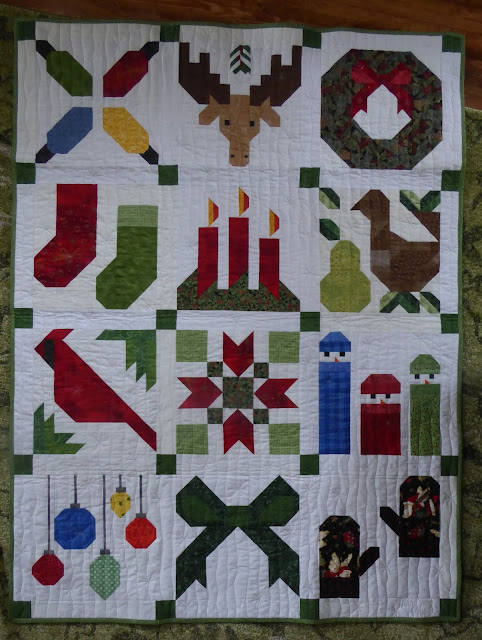
Two weeks ago, I decided to finish up my grands' Jolly Little Christmas sampler quilts and hand them off to their mother this weekend to save on mailing.  The quilts are their BIG present from Grandma this year but I wanted them to be able to enjoy the quilts throughout December!!
By keeping the quilting simple and staying focused I was able to have the quilting finished in a week!?!  I used long vertical wavy lines with snowflakes inserted randomly.
Lori Kennedy's Snowflake tutorial was the inspiration -- check it out HERE
To have them ready in spite of being on the road for six days, I cut the bindings and packed the trimmed quilts and my machine in the car. 
As good luck would have it, the hotel on my free evening had a desk that was perfect to get the job done and enjoy another episode of Vera (my current English crime favorite). 
I returned home yesterday afternoon and after putting away the stack of quilts from my lecture for the National Road Quilt Guild in St. Clairsville, Ohio -- I was ready to wash and dry the newly finished quilts so they are ready to wrap and hand off this weekend! 
I always wash quilts before giving them away.  My go to settings are lots of cold water on gentle cycle with an extra rinse.
I have used Quilt Soap for over 30 years and it always does the job well!  It's gentle, pure, and rinses out completely.  It's also very concentrated, so a little goes a long way.
Thankfully, I noticed this little bleed mark when I was binding the quilts.
That meant, add ColorCatcher sheets.  The box says two but I put in three just in case.
Then I had to find something to do so I could hear the washing machine when it finished -- it doesn't do to leave wet quilts laying in the machine when you are trying to control bleeding.
Glad I did that!!
Look what's down there at the bottom of the machine!?! 
Pink!!
I ran each quilt through another rinse just to be sure all the renegade red was out. 
Fifteen minutes in the dryer on low and then I hung them outside to take advantage of today's breeze to finish the job!
My grandson's version has a male cardinal and the moose.  I used green for the cornerstones and the binding.
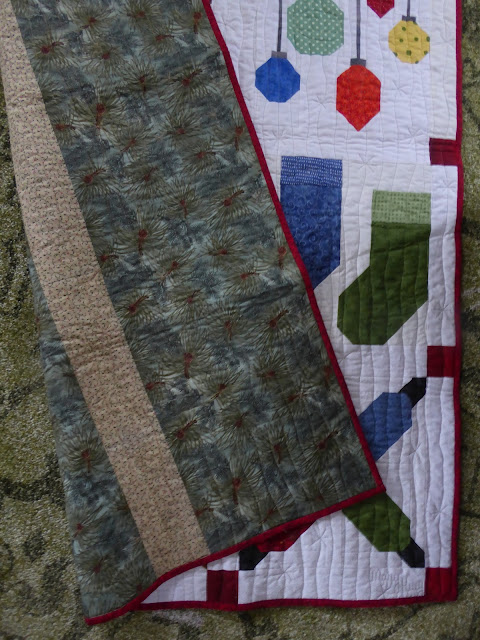
The backing is so cute and so perfect for this kid who loves to be outdoors.
He doesn't have a red pickup yet (he's only 9) but I wouldn't be surprised if there's one in his future. 
My granddaughter's quilt has a female cardinal and the reindeer block.  I used red for the cornerstones and the binding. 
The backing is a beautiful print of pine boughs from Hoffman Fabrics that I have been hoarding for years! 
I signed both quilts, dated them, and quilted the kids names into them.
I used Quilter's Dream Machine Blend batting and a silvery gray Isacord rayon thread left over from my machine embroidery days.  
You can find the patterns for these blocks and a few more over at Sew Fresh Quilts!

So two BIG presents done and two finishes from my fourth quarter 2017 Finish A Long list!!
What's next?!?
If you follow @52quilters on Instagram, I'm next week's host!!
Lots of y-seam fun stuff planned!!

Enjoy the weekend!
Mary


Wednesday, November 8, 2017

Taking a few days off . . . .

. . . . . . because I was 15 minutes (and six days?) early for my doctor's appointment this morning and then I didn't show up for a work session (that I scheduled) for my quilting group?!?  I'm off for a long weekend to see the grands and do some family history research, so I'll be back at the blogging in a week (or so). 

In the meantime, here's pictures from a walk yesterday to show you some of the fall foliage inspiration here in Northeast Ohio!!

I might miss the big leaf drop -- almost every leaf is now yellow and we are waiting for the first frost that will bring all of them down.  Looking up into the woods nearby (mostly maple and beech), the foliage is thinning.
The ground is covered with yellow leaves that quickly turn brown and the occasional red maple leaf lays on top of the layer like an accent.
The acorn crop is plentiful this year and the squirrels can't seem to eat or bury all of them.
The mitten-shaped sassafras leaves are among the most colorful but it also looks like they are delicious -- look at all those little holes -- must remember to look up what caterpillars eat them!
The only green left on the forest floor are the evergreen Christmas ferns which will soon be peeking up through a layer of snow.
The trail ends at the top of a crumbling bluff and one can survey the river valley 50 feet below.
The panorama of rust and gold sparkles in the sporadic afternoon sunshine.
The stately sycamores have already lost most of their leaves and they look like ghost trees.
One of the parts of a season with no leaves that I love is being able to see the architecture of the woods -- stately trees such as these that are hidden from view by summer's leaves.
It will be dark soon so time to go home and stitch something.
As I walk back to my car, I stop to look for the source of the soft tapping I can hear overhead.
There he is -- a handsome male pileated woodpecker!
We've lost lots of trees in our woodlands to invasive insects and diseases and it makes me sad. 
But I have to celebrate the expansion of these magnificent woodpeckers who benefit from all the dead trees.

Have a pleasant weekend -- soak up the changing seasons and do some stitching!!

Mary