Monday, September 26, 2016

Morris Hexathon Blocks -- #20 and #21

With only 5 more blocks to go for Barbara Brackman's Morris Hexathon, I'm only one block behind.  This weekend, I pieced #20, Walthamstow named after the village where William Morris grew up.
It's an easy block to machine piece but none of my templates were the right sizes, so I fiddled my way through the cutting process which is why the outer triangles look too big in the photo below.  It would probably have been easier to make templates!!  If you do this block, watch the cutting of the triangles -- you don't want some to be reversed.  Cut a single layer and keep both fabrics right sides up!!
The other block I finished is #21, Queen Square named for his early home and workshop in London.
I was able to use Templates G48 and G49 to cut all the pieces needed.
It's so helpful to trim the tips of the 60 degree corners of the triangles for #20!  Use Marti Michell's Deluxe Corner Trimmer if you don't have any of her 60 degree templates.
The trim takes all the guess work out of matching the triangle to the center hexagon. 
The first seam on this block should be a partial seam -- stopping about half way along the seam. 
The remaining seams can then be stitched completely from raw edge to raw edge. 
Once all the triangles are stitched in place, the first seam can be finished. 
And here is my finished block (after trimming)! 
There are probably several ways to break down block #21 for construction.  It's always a good idea to lay out the units before you begin to stitch!
Since I was using 3 different pinks and wanted the pairs of diamonds to be touching, I had to lay out each step and be sure I was stitching the right arrangements together.  Had I stitched the pieces together the way I laid them out above, it would have been wrong. 
Once the four piece units were assembled, I constructed three units as below -- it was much like piecing a tumbling block unit if you use the Set-In Piecing Simplified technique. 
Haven't learned this amazing technique for y-seams yet?
You can order my DVD HERE for only $15.95 which includes shipping!
As in any six-pointed hexagonal block, pressing each unit identically gives the best results. 
This is the result of going too fast and not checking before I stitched . . . .
 "you know what to do, Mary"!
 
 Don't press once the three units are together as the final diamonds will be easier to insert. 
And here's the final result!  Pretty block!  I fussy cut the six center diamonds with lovely results from a small busy all-over floral thanks to all the inspiration I get on Instagram watching the Aussie EPP stitchers I follow create awesome blocks! 
It's a quilty week here in Northeast Ohio. 
 
The National Parks 100th Anniversary Quilt touring exhibit continues on display through October 5, 2016 at Lake Metroparks Farmpark in Kirtland, Ohio.  I haven't been yet, but friends who have are enjoying it!
 
The Streetsboro Quilt Guild's 31st Annual Show will be this weekend -- Friday, September 30 and October 1 -- click HERE for complete information!
 
Also on Friday and Saturday, the Tree City Quilters of Wooster, Ohio is hosting their biennial guild show and you can get updates about it on their Facebook page HERE.  I'll be at this show helping Denise from Mercantile On Main (Coshocton, Ohio) in her booth -- actually, we'll just be laughing a lot -- so stop by and say hello!
 
Mary


Sunday, September 25, 2016

One more Blogger's Quilt Festival entry!

This is the cover quilt for my pattern Dresden Star.
I designed it to introduce my set-in piecing workshop students to a block found in a vintage quilt by local shop owner, Karen at The Little Red Quilt House in Medina, Ohio.
This version measures 44" by 48".
I used a layer cake of 10" squares called Good Karma from Moda designer, Stephanie Ryan plus a yard and a half of white background fabric.
I love this picture of it taken in February with a little snow on the ground!
The decision to use white as the main borders had more to do with "not enough fabric" than anything else, but I think the two white borders do a great job of setting off the scrappy second border.
The quilt has a crisp look that I love! 
The original test block I did on the fly for this block is in the center of this piece.
(Read my previous posts about experimenting with this block by searching for "Dresden star".)
 I ran another test of the piecing process as part of a Kaffe Fassett mini swap on Instagram.
The pattern for the quilt is available in my Etsy Shop HERE. 
If you indulge in it, I urge you to adapt the block to your own ideas and settings!!
It's fun!!

Thanks for considering my entry in the Original Designs category at the Blogger's Quilt Festival!

Mary Huey


Saturday, September 24, 2016

Blogger's Quilt Festival Entry #2

Dream Birds
51" by 66"
Using a blocklotto.com pattern for the birds and with help from the ladies of Stash Bee Hive #7 during 2015, I assembled this funky quilt finishing it in July, 2016. 
It's just for fun -- no idea how I'll ever use it.

The extra blocks have been crafted into these cute drawstring backpacks for my grands!!

Love the bird block -- go HERE for the pattern!

Thanks for checking out my entry!
And don't forget to check out all the other entries at the Blogger's Quilt Festival this coming week!

Mary Huey

10/3/2016 -- Thanks for making this quilt one of the top ten vote getters in the Blogger's Quilt Festival!!


Monday, September 19, 2016

The Bug Hut is FINISHED!!

It's been almost a year and a half since I showed this quilt top from a round robin group -- pieced, embellished and ready to quilt!  You can see my original post HERE.
Over the weekend, I finished the binding and added a casing -- now to figure out where to hang it!
While it does look great out in the middle of the yard, it will need to come inside!
And happily, it's finished just in time to enter into the Blogger's Quilt Festival over at Amy's Creative Side -- entering it into the Small Quilts Category!!
I've been hand quilting it with big stitch in pearl cotton all summer.  Just having fun and being spontaneous on how to quilt each section.  I started in the center with the "hut" and did more embroidery than big stitch. 
Experimenting with ideas, not worrying about what it looks like on the back. 
Then I moved through the six mini-huts surrounding the center.  It's easier to see the outlining I did from the back.
These big "polka dots" seemed perfect for the sashing frame around the center hut.
I got a little carried away with this big bug and jazzed up his wings with embroidery.
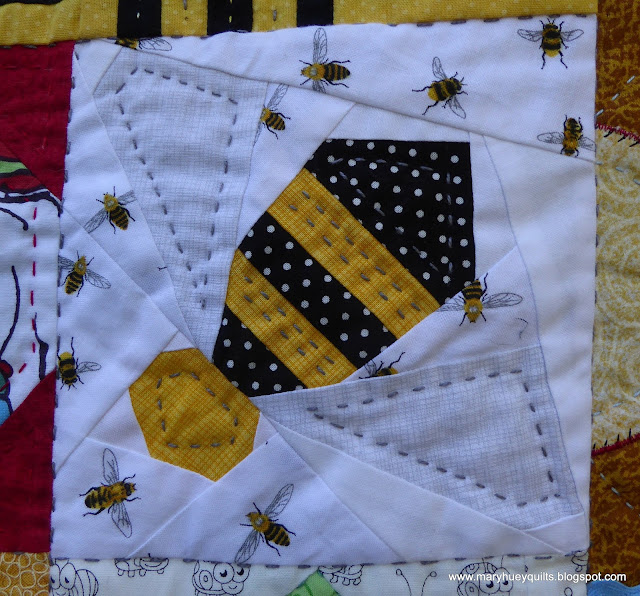
My favorite blocks in this quilt are the bees -- the quilting I added defined the wings and made the strips stand out more.
The quilting I added to the fans make them look more like sunbursts -- bugs love sunshine!!
Have you noticed you rarely see pollinators on cloudy days?
Inspired by the spiders who live by my backdoor every summer, I captured the four bugs in the corners of the outer borders in webs.
I also used webs to fill the blank area in the upper and lower borders. 
This is the label that traveled around with the quilt as it was being constructed -- nice to have it incorporated right into the backing!
I love that I was able to finish this quilt.  It will be a "summer" quilt in one of the groups that I rotate on the walls in my home. 
There is so much about this quilt that makes me smile, I know I'll always enjoy looking at it!
And it makes the third finish for the third quarter from my 2016 Finish Along goals!!
You can explore the growing group of third quarter finishes HERE and explore the tutorials!
Yea!!

The Bug Hut
42" by 48"
My Round Robin quilt from a group organized by Bea at http://www.beaquilter.com/

Mary

Be sure to click through to the Blogger's Quilt Festival next week to drool over lots of great quilts and vote for your favorites!!


Thursday, September 15, 2016

Quilting Smitten!!

One of my teaching goals for the past several years is to be better prepared to discuss "how to quilt" projects with my students.  In order to accomplish that, it's important for me to quilt most of my own work because experience is such a reliable method of instruction.
The machine quilting of Smitten is well underway -- I've adhered to my schedule by and large and am at the halfway point. I turned to Instagram for quilting inspiration and am so grateful to Kaye Hoffman of Australia who shared a number of photos of her finished version of the quilt five months ago on Instagram -- you can check some of them out for yourself by heading over HERE
Her quilt was quilted by Judy Simcock (you can see more of Judy's work HERE) who is not only a professional machine quilter, but she organizes stitching retreats that look like lots of fun!  The designs she used on Kaye's quilt inspired me as I began to work on my quilt.   While I didn't copy her designs and placement, you can see the impact she had on the designs I've created for my own quilt.
I thought I'd share the specifics of two of the simpler motifs as it might be helpful to you.
The first I've used in most of the hexagons that are the centers of a block.
It is made up of two arced "triangular" passes around the hexagon.
I begin in the first corner, using a "Fine Line" continuous curve tool.  (Click HERE for their website.)  The tool is aligned with the outside edge of my edge following presser foot and aligned 1/4" to the left of the third corner.
The tool is repositioned for two more arcs and I return to the first corner.  If you don't have a ruler, you can draw an arc or freehand it (which is what I did before I discovered the tool).
As I stitched the arcs along the inside of the pink triangles, I "interrupted" that trail and stitched a second arced triangle in the hexagon connecting the three remaining corners and completing the star shape.
Upon returning the last corner, I continue with the design of the shapes around the hexagon.
In the center of this large hexagon, you see a third set of arcs that travel from the tip of a green plaid diamond to the next green plaid diamond -- these are actually my "traveling" lines but they also add more interest to the quilting of the large yellow hexagon (and eliminate lots of thread tie-offs spots).
Here's the same treatment of a smaller hexagon in the center of this star block.
To quilt the background diamonds in this block, I used a "polka dot" motif to fill the center of the diamonds.  To begin, I marked the center of each diamond.  I lined up my straight "Fine Line" tool and stitched a straight line from the point of the diamond,
stopping when my presser foot reached the center mark. 
Now I (very slowly) stitched a circle and re-traced around the left side of the circle  
before completing the straight line to the opposite end of the diamond.  You can still see my "stop" point marking in this picture.  I added arcs around the four sides of each diamond to finish them up!
Once I figure out how to quilt a block, I repeat that quilting design in the rest of those same blocks.  Saves time and mental energy and unifies the quilt!
As you can see, Willie approves of my progress so far!  He was on that quilt in a flash when I took it outside to take advantage of the sunshine for the photo session.
I hope these ideas give you inspiration for quilting your hexagonal blocks -- I know I'm going to bookmark this post so I can refer to it for future 6-pointed star quilts because there are more of them in my future!!

And if you want to start your own version of this delightful pattern, HERE is a link to a seller!

I hope you get all the stitching time you want this weekend!!

Mary